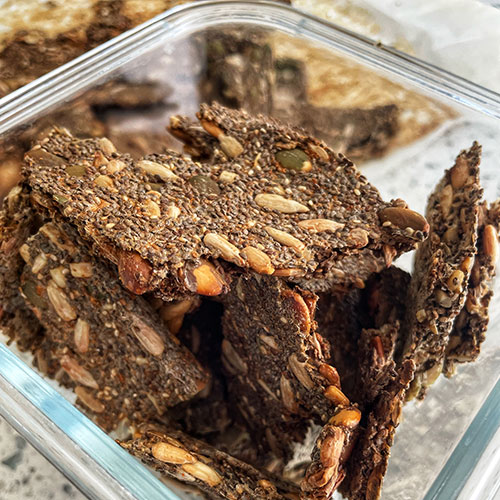
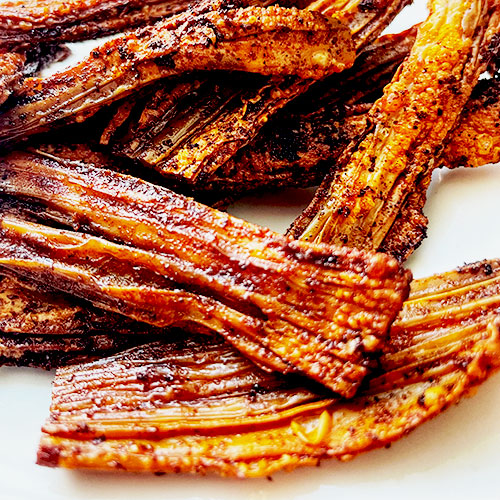
Category Archives: Recipes

Categories Dine, Recipes

Vegan White Bean Stew

Vegan White Bean Stew

Author Shani - Lemon Tree Nutrition
Vegan meals can sometimes be intimidating to non-vegans. Where’s my protein? Will it keep me full for long enough? This super flavourful dish answers it all. A nice combo of plant protein, complex carbs, good fats and loads of fibre to keep you fuller for longer. Serve it over your favourite rice, mashed potatoes or toast.
Prep Time 10 minutes
Cook Time 20 minutes

Equipment

  • Medium-sized pot or a large skillet
  • Sharp knife
  • Serving bowls

Ingredients
  

  • Olive oil for sautéing
  • 1 large onion thinly sliced
  • 6 garlic cloves minced
  • 3-4 carrots thinly sliced
  • 5 tablespoons tomato paste
  • 1 tablespoon sweet paprika
  • ½ cup water
  • 2 cans of white kidney beans drained
  • 1 can of coconut cream
  • Salt & freshly ground pepper to taste
  • Optional - chopped parsley for garnish

Instructions
 

  • In a pot or a large skillet, heat some olive oil and start sautéing the onion on high heat. The goal is to have the onion become golden brown. About 10 minutes.
  • Add garlic and carrots. Cook until softens, about 2-3 minutes.
  • Add the tomato paste and paprika and mix well.
  • Add the water if the mixture becomes too dry.
  • Pour in the drained beans and mix. Allow cooking for 2 minutes.
  • Turn the heat to medium and add the coconut cream and stir carefully.
  • Add salt and pepper to taste and adjust to the desired flavours.
  • Serving option: Place some cooked Basmati rice in a bowl and top with a few tablespoons of the bean stew. Garnish with parsley and serve hot.

Notes

For a spicy version, replace some of the sweet paprika with hot paprika.
Leftovers are delicious the next day too.
Categories Recipes, Snack

High-Protein Dairy Dip with Roasted Peppers

High-Protein Dairy Dip with Roasted Peppers

Author Shani - Lemon Tree Nutrition
Protein, being one of the 3 macros, not only helps us build tissue, maintain good health and support a good immune system but can also assist with weight management by keeping us fuller for longer. This high-protein dip is super satisfying and can help with cravings and munchies.
Prep Time 10 minutes

Equipment

  • Food processor or blender

Ingredients
  

  • 1 container cottage cheese 500 grams
  • ½ teaspoon onion powder
  • 2-3 pieces jarred roasted red peppers drained
  • Salt & pepper to taste
  • Chopped chives for garnish optional

Instructions
 

  • In a blender, place the cottage cheese and onion powder and blend until smooth.
  • With a paper towel, pat dry the drained peppers to remove excess moisture. Add the peppers to the blender and blend again until smooth.
  • Taste and add salt & pepper to taste.
  • Place in a serving dish and garnish with chopped chives or keep refrigerated in an air-tight container. The dip will keep good at roughly the same time as the stated expiry date on the cottage cheese container.

Notes

Cottage cheese comes in a variety of fat % content. This recipe works well with any type of cottage cheese.
Dip your veggie sticks and enjoy as a satisfying snack or you can spread it over toast, bagel or crackers as a substitute for cream cheese.
For a thicker dip, prior to blending place the cottage cheese in a cheesecloth for a couple of hours to drain excess liquid.
Categories Recipes, Snack

Vegan, gluten-free savoury crackers

Vegan, gluten-free savoury crackers

Author Shani - Lemon Tree Nutrition
I’m fascinated by chia seeds. These tiny little dot-size gems can absorb up to 10 times their weight in liquid! Once they become gelatinous, they can act as a thickener and an egg replacement in baking. In this simple & easy crackers recipe, chia seeds star alongside 2 more seeds which are all good sources of minerals such as calcium and zinc. They also provide protein and fibre as well as a good plant-based source of omega-3.
If you prefer non-savoury crackers, please read the notes at the bottom.
Prep Time 15 minutes
Baking 40 minutes

Equipment

  • Medium bowl
  • Fork
  • Parchment paper
  • Large baking sheet

Ingredients
  

  • 1 cup chia seeds
  • 2 cups water
  • ½ cup pumpkin seeds
  • 1 cup sunflower seeds
  • 1 teaspoon salt
  • 1 teaspoon paprika
  • ½ teaspoon garlic powder
  • ½ teaspoon onion powder
  • ½ teaspoon pepper freshly ground

Instructions
 

  • Heat your oven to 350 degrees F or 180 degrees C.
  • Prepare a large baking sheet covered with parchment paper, leaving about 1-inch edges of the parchment paper. Set aside.
  • In a bowl, place the chia seeds and pour in the 2 cups of water. Stir well with a fork and let sit for 10 minutes allowing the mixture to become gelatinous.
  • Add the pumpkin and sunflower seeds as well as the spices. Stir well.
  • Transfer the mixture to the baking sheet and smooth with a spatula ensuring the mixture is spread as evenly as possible, to allow consistent results.
  • Place the baking sheet at the centre of the oven and bake for about 40 minutes. The mixture should look dry and have a bit of golden colour on top. When tapping, it should feel hard to the touch and cracker-like feel.
  • When the cracker sheet is ready, remove it from the oven and transfer it to a cooling rack. Wait about 10 minutes or until you are able to hold the cracker sheet in your hands.
  • Break the crackers with your hands to the desired sizes and allow them to cool completely.
  • Place in an air-tight container and enjoy within up to a week with your favourite dip or spread.

Notes

These crackers can be made neutral-tasting or lightly sweetened instead of savoury.
For neutral, simply omit all spices. For sweetened, omit all spices and add 1 tablespoon of sugar and 1 teaspoon of cinnamon (optional).
Categories Recipes, Sip, Snack

Refreshing Pineapple-Mint Popsicles

Refreshing Pineapple-Mint Popsicles

Author Shani - Lemon Tree Nutrition
Popsicles can definitely be crowned as one of the summer’s best treats. They are sweet, refreshing and cooling. When I thought about a recipe to emphasize the cooling effect, I knew I had to incorporate some mint leaves. For a bright and zesty colour, I decided to combine it with pineapple. As both pineapple and mint can help with digestion, this popsicle is literally gut-friendly!
Total Time 10 minutes

Equipment

  • Food processor or blender
  • Popsicles moulds

Ingredients
  

  • 1.5 cup pineapple chunks frozen or fresh
  • 1 ripe banana peeled
  • 8-10 fresh mint leaves stems removed
  • 1 cup water
  • A splash of maple syrup to taste

Instructions
 

  • In a blender, place all ingredients and blend until smooth.
  • Carefully pour the blended liquid into the popsicle moulds and freeze for at least 6 hours or overnight.
  • When ready to enjoy, carefully remove the cover from the popsicle.
  • Enjoy on a hot summer day.
Categories Dine, Recipes

One-pot Chicken and Potatoes Stew

One-pot Chicken and Potatoes Stew

Author Shani - Lemon Tree Nutrition
Quick prep. One pot. No mess. Now place the lid on and go do your things while it cooks. Double the amount to have leftovers and an amazing sauce to have with rice once the potatoes are all gone. This is a staple dish in our home and I have probably made it 500 times over the years.
Simple. Easy. Delicious.
Prep Time 1 hour 30 minutes

Equipment

  • A wide, large pot
  • Cutting board
  • Sharp knife

Ingredients
  

  • ¼ cup cooking oil of choice
  • 8 Drumsticks or chicken thighs, with skin and bones washed and pat dried
  • 4 potatoes cut into 8 pieces each
  • 1 large onion sliced into 8 chunks
  • 2-3 carrots chopped into 8 pieces each
  • 4 cloves of garlic smashed
  • ¼ cup soy sauce
  • 2 tablespoons tomato paste
  • 1 teaspoon paprika powder
  • ½ teaspoon smoked paprika optional
  • ½ teaspoon cumin powder
  • ½ teaspoon ginger powder
  • ½ teaspoon freshly ground black pepper
  • Salt to taste
  • Freshly chopped parsley optional

Instructions
 

  • In a large pot, heat the oil on medium-high heat.
  • When oil is warm, carefully add in the onion and cook until softened, inserting a large fork into each piece to separate the onion layers.
  • Add the chicken parts and fry until one side is lightly golden. Turn the pieces to fry the other side until lightly golden.
  • Add in the smashed garlic and carrot pieces. Give it a quick stir and add the soy sauce and 1 cup of water. Cover the pot with a lid and allow to cook for about 10 minutes.
  • Remove the lid and add the tomato paste and spices. Please taste before adding more salt as the soy sauce is already salty. Add water just to barely cover the chicken parts. Stir to allow the water, tomato paste and spices to mix well.
  • Cover the pot with a lid, reduce heat to medium and cook for about 30 minutes.
  • Add the potatoes, and add water to barely cover the potatoes. Bring to a boil and then reduce to medium heat. Taste the liquid to see if more salt is required.
  • Simmer for additional 45 minutes until the liquids have reduced a bit and the potatoes are softened.
  • When the stew is ready, sprinkle some parsley, if using, and serve hot.

Notes

You can omit the potatoes and simply cook the chicken parts until they are very soft. Meanwhile, cook some rice in a separate pot and serve the stew over rice.
Categories Recipes, Snack

No-Bake Granola Bars

No-Bake Granola Bars

Author Shani - Lemon Tree Nutrition
The shelves at the grocery store are packed with granola bars. Why bother making them at home? Because these seriously beat any granola bars I have ever had. They are incredibly delicious, satisfying and simple to make. When feeling like having something sweet and nutritious, these will become your favourite go-to granola bars.
Prep Time 30 minutes
Refrigeration 4 hours

Equipment

  • Food processor
  • Small saucepan
  • Medium bowl
  • Baking pan, 9x9 inches
  • Parchment paper

Ingredients
  

  • 200gr pitted date fruits
  • 1.5 cups large oats
  • 1 cup almonds or hazelnuts
  • ¼ cup honey or maple syrup
  • ½ cup sesame paste
  • ½ teaspoon cinnamon powder optional
  • A pinch sea salt
  • ½ cup semi-sweet chocolate chips

Instructions
 

  • Place dates in the food processor and pulse until small, sticky crumbs are formed. These may come together to a ball as you process. Move into a medium bowl and set aside. No need to clean the food processor yet.
  • Lightly toast the almonds or hazelnuts. Place in the food processor and pulse into medium-size pieces. Add the nuts to the bowl of dates.
  • Lightly toast the oats. Add to the bowl of dates and nuts.
  • Place the honey (or maple), sesame paste and cinnamon powder (if using)  in a small saucepan and warm up. Stir to combine. Do not boil or overheat.
  • Pour the warm mixture onto the dates, nuts and oats. Add a pinch of salt.
  • Mix well with a fork, ensuring the dates pieces are well spread in the mixture.
  • Allow mixture to cool a bit.
  • Add chocolate chips and mix in with a fork.
  • Line your 9x9 pan with parchment paper leaving enough paper edges for easy removal of the bars after cooling. Pour the mixture in, flattening and levelling it in the pan.
  • Cover with Saran wrap and refrigerate for at least 4 hours or overnight.
  • Using the edges of the parchment paper, carefully remove the bar from the pan onto a cutting board. Cut into 8-10 even bars. Keep refrigerated in an air-tight glass container for up to a week.

Notes

Nut-free version - Replace the nuts with sunflower seeds. 
Vegan version - Use maple syrup (instead of honey) and vegan chocolate chips.
Categories Recipes, Snack

Chocolate-Hazelnut Energy Bites

Chocolate-Hazelnut Energy Bites

Author Shani - Lemon Tree Nutrition
I love chocolate. So if I can have both a nourishing and chocolaty snack - now that’s a bonus! These little bites are definitely my go-to whenever I have these cravings. I keep them in the freezer in a container to grab as a pre- or post-workout snack. Sometimes they just call my name and I just have to answer. Wouldn’t you?
Prep Time 15 minutes

Equipment

  • Food processor or a powerful blender
  • 2 small bowls

Ingredients
  

  • 15 Medjool dates pitted
  • Some boiling water
  • 1.5 cup raw hazelnuts
  • ¾ desiccated coconut unsweetened
  • cup good quality cocoa powder
  • 1 teaspoon cinnamon powder optional
  • 1 teaspoon vanilla extract optional

Instructions
 

  • Place the dates in a heat-proof bowl and carefully cover with boiling water. Allow the dates to soak for about 20 minutes.
  • While the dates are soaking, place the raw hazelnuts on a baking tray and bake at 350 F or 180 C for 5 minutes or until hazelnuts are warm to the touch. Carefully remove from the oven and divide hazelnuts into 1 cup and 0.5 cups.
  • Place 0.5 cups of hazelnuts in the food processor and process to a meal texture. Place the hazelnut meal in a small bowl and set it aside. No need to clean the food processor container before the next step. Simply place it back on its engine.
  • Drain the softened dates discarding the water.
  • In the food processor place dates, the remaining whole hazelnuts (1 cup) and the desiccated coconut. Process until a crumbly mixture has formed.
  • Add the cocoa powder, cinnamon and vanilla extract (if using). Blend until a sticky dough-like texture has formed, and most of the mixture is coming together. Stop blending to scrape the sides if needed.
  • With a teaspoon, scoop enough mixture to create 1-1.5 inch size balls. Roll the balls in the hazelnut meal.
  • Keep bites refrigerated or place in a freezable container to enjoy later.

Notes

For additional coating options, roll the balls in a ⅓ cup cocoa powder or desiccated coconut.
Categories Dine, Recipes

Homemade Pizza

Homemade Pizza

Author Shani - Lemon Tree Nutrition
If I had to choose one food that I could eat quite often, it would be Pizza. I enjoy making the dough from scratch at home, choosing toppings from what I can find in the fridge. Plus it does not get fresher than that. I love the sizzly sounds as it comes out of the oven and the endless options I have for toppings. Making homemade pizza is easier than you may think and worth the effort.
Prep Time 2 hours
Baking 20 minutes

Equipment

  • Mixer - optional
  • A large bowl
  • A cookie sheet or pizza stone - optional

Ingredients
  

  • 500 grams 00 pizza flour or unbleached, all-purpose flour
  • 30 grams fresh yeast or 2 teaspoons active dry yeast
  • 1-1.5 cups warm water
  • 1 teaspoon sugar
  • ¼ cup virgin olive oil
  • 2 teaspoons salt
  • 1 large jar tomato/pizza/pasta sauce of choice
  • 300 grams grated Mozzarella cheese
  • 1 cup grated Parmigiano Reggiano
  • ½ onion very thinly sliced, layer separated
  • Good quality dried oregano

Instructions
 

  • In a medium bowl, place 1 cup of warm water. To ensure the temperature is proper for the yeast and warm enough, you should be able to safely and comfortably dip your finger in the warm water for 30 seconds. Add the sugar and crumble the fresh yeast or sprinkle the dry yeast onto the water. Mix with a fork. Let sit until frothy (about 10 minutes).
  • In the mixer bowl with a kneading hook (or in a large bowl if you have no access to a mixer) place the flour and olive oil.
  • Once the yeast has some froth at the top, begin mixing the flour and oil at low speed, slowly pouring the yeast mixture into the flour. After about 1 minute add the salt and continue kneading until a ball is formed, which is a little sticky. If it is too wet or sticky, add a little flour. If too dry, add a bit more warm water.
  • Remove the mixing bowl from the mixer. Remove the dough hook. Cover the bowl with a plastic wrap or a clean, slightly wet kitchen towel. Place at a warm spot and allow to rise for about 60-80 minutes until doubled in volume. If kneading by hand, place in a large bowl and cover.
  • Once the dough has doubled remove the plastic cover or towel. Prepare a surface to roll the dough on, sprinkled with flour to avoid sticking to the surface. Cut the dough into 4 equal parts and begin rolling each section into a thin layer.
  • Preheat the oven to 450 F. If using a pizza stone, place it in the cool oven and heat them together. If using a cookie sheet, sprinkle some flour on the cookie sheet. Place the dough on the cookie sheet or heated pizza stone.
  • Spread ¼ of the pizza sauce on the dough. Top with ¼ of the thinly sliced onion, oregano, and mozzarella. Sprinkle ¼ of the Parmesan cheese last.
  • Place in the bottom rack in the oven and bake for about 10-20 minutes until cheese is golden and the dough is cooked (time depends on the thickness of dough and if using a cookie sheet or pizza stone).
  • Repeat with the other 3 pizza doughs.
  • This pizza freezes well and can be kept in the freezer for up to a month in an air-tight container. When ready to enjoy a slice of pizza, remove the desired amount from the container and place in a preheated oven to 350 F until the pizza is hot.

Notes

Feel free to add your favourite toppings. Overloading the pizza with topping may result in soggy pizza dough. My favourite toppings are onion, sweet potato (cubed and roasted) and goat cheese in addition to the basics offered here.
You can omit the tomato sauce, replacing it with a generous coating of olive oil before placing the toppings.
Categories Dine, Recipes

The world’s quickest vegetarian meal

The world’s quickest vegetarian meal

Author Shani - Lemon Tree Nutrition
Prep Time 10 minutes
Cook Time 5 minutes

Equipment

  • A medium glass or ceramic mixing bowl
  • A large plate or lid to cover the bowl
  • A medium-sized pot
  • Fork

Ingredients
  

  • 1 cup dry couscous fine or medium
  • 1 teaspoon salt
  • ¼ cup virgin olive oil
  • 2 cups water boiling
  • 1 can organic chickpeas or beans of choice
  • 1 jar high-quality, organic pasta sauce, 650 ml
  • Salt, pepper and garlic powder to taste

Instructions
 

  • Place the dry couscous in a medium bowl. Add the salt and olive oil. Mix well with a fork until all the couscous turns a bit shiny.
  • Add the boiling water, quickly stir with a fork and cover with a large plate, lid or plastic wrap. Bowl must be completely covered. Set aside for 5-10 minutes.
  • In the meantime, pour the pasta sauce into a pot and bring to simmer. Add drained chickpeas or beans and mix. Bring to simmer again. Add salt, pepper and garlic powder if needed, to taste.
  • With a fork, fluff the prepared couscous to separate the grains as much as possible.
  • To serve, place the desired amount of couscous in a small bowl, top with the prepared sauce.

Notes

For a spicier version, replace the pasta sauce with an Indian-style cooking sauce such as Tikka Masala sauce or a prepared sauce for butter chicken (a vegetarian version).
Categories Dine, Recipes

Carrot and Red Lentil Soup

Carrot and Red Lentil Soup

Author Shani - Lemon Tree Nutrition
It’s a chilly evening, and you are craving a super quick, easy-to-make dish that will satisfy your hunger, nourish you and, most importantly, be delicious. I give you one of my favourite soups to make and eat. It’s high in fibre, satisfying, delicious and super-quick to prepare. Plus it’s vegetarian!
Prep Time 5 minutes
Cook Time 20 minutes

Equipment

  • A medium-sized pot
  • A sharp knife
  • Serving bowls

Ingredients
  

  • ¼ cup olive oil
  • ½ large onion chopped
  • 2 cloves of garlic finely chopped
  • 1 stick celery chopped
  • 1 teaspoon fresh ginger grated
  • 2 carrots chopped
  • 1 teaspoon curry powder
  • ½ teaspoon cumin
  • ½ teaspoon turmeric powder
  • 1 tablespoon soy sauce
  • 1 teaspoon salt
  • Fresh ground pepper to taste
  • 1 litre carrot juice or water
  • ½ cup red lentils thoroughly washed and drained of access water
  • Optional your favourite chopped herbs

Instructions
 

  • In a pot, heat olive oil. Add the onion and saute until the onion turns translucent. Add garlic, celery, ginger and carrots. Cook until softens.
  • Add the rest of the ingredients and cook for about 15 minutes until lentils are soft.
  • If the soup is too thick, add some more carrot juice or water.
  • Adjust spices to taste.
  • To serve, place the desired amount in a serving bowl and garnish with your favourite herbs, such as cilantro, basil, parsley, dill or mint.

Notes

For a spicier version, while mixing in the spices add some chilli flakes or a bit of chilli pepper powder.
The quantities here are for about 4 servings. You can double all ingredients to have more as this soup is great the next day too.